
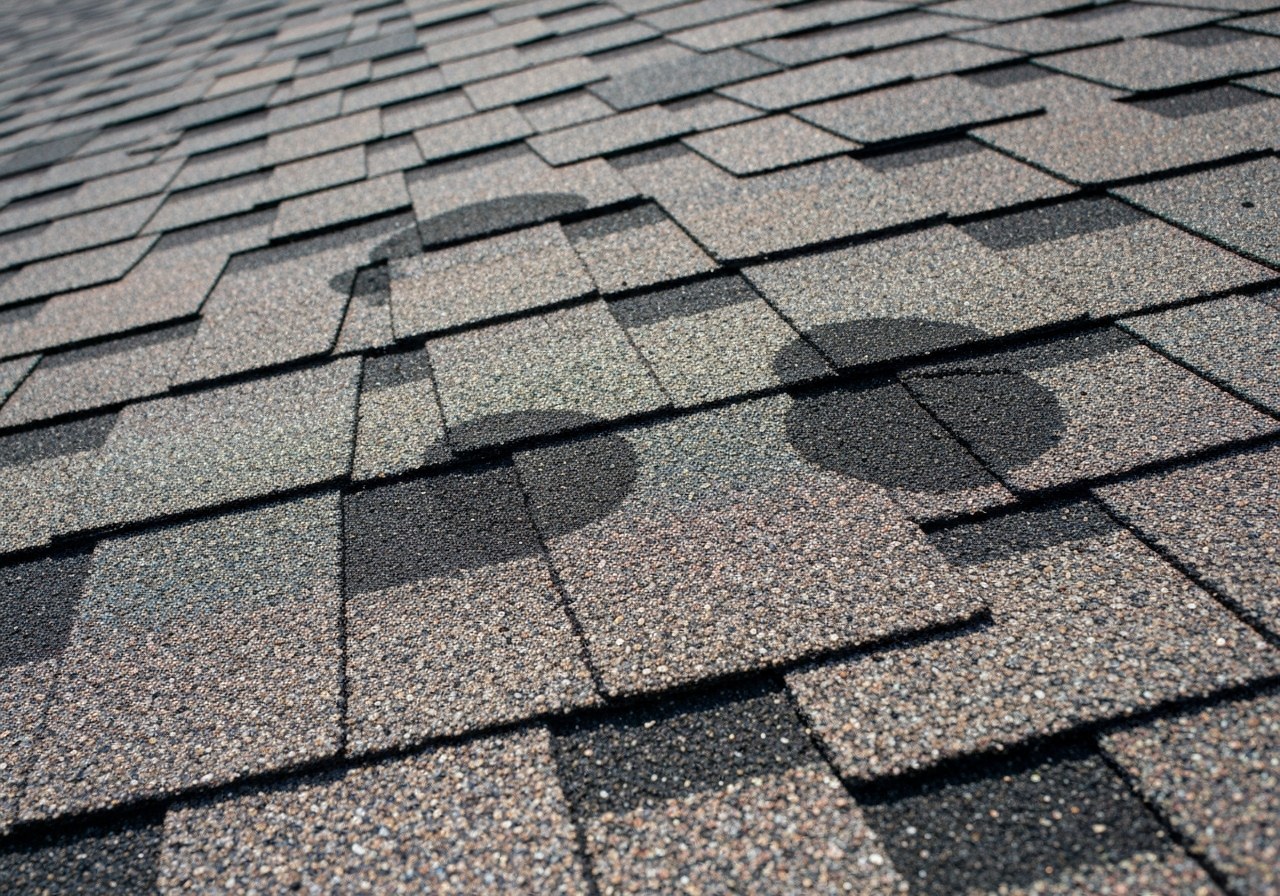
Severe hailstorms create concentrated, visible impact patterns that standard roof wear does not. Those patterns, plus collateral signs such as dented vehicles and displaced granules, are the primary evidence insurers use to classify damage as storm-related rather than age-related.
If you do not document hail-specific indicators promptly and clearly, you risk a denial or a reduced payout on grounds of pre-existing wear. Timely, focused proof preserves replacement value, protects against disputes, and reduces the chance that depreciation will consume the majority of any recovery.
This guide explains how to document hail damage safely, how to file and manage the claim, what to expect from adjuster inspections and estimates, how ACV and RCV payments work, common reasons claims are denied and how to appeal, and practical steps for working with contractors while remaining fully compliant and ethical. Read on for the immediate actions you should take to preserve evidence and strengthen your claim.
Overview — How hail claims for roofs differ from general roof claims
A hail-specific roof claim is defined by impact patterns, granule loss, and under-layer bruising that are distinct from general wear-and-tear or wind damage.
Quick summary
Hail claims are identified by impact marks, missing granules, and soft spots ("bruising") on shingles that indicate a single storm event.
Documenting those signs with date-stamped photos and an inspection report proves the event and links damage to the claim.
Timing matters because insurers measure damage against pre-loss condition and policy timelines. File promptly and preserve evidence to support scope and payout.
Local context
In the Houston/Katy area hail season is typically March–June, with storms that commonly produce pea- to quarter-sized hail; larger sizes are possible during severe cells. Adjusters generally prioritize large storm events and, after a surge of claims, you can expect visits within about 7–21 days; this varies by company and storm load. Next: immediate steps after a hailstorm — how to document damage safely.
Immediate steps after a hailstorm: document damage safely
Safety first
Do not climb on the roof after a storm — wet, loose, or dented shingles and hidden structural damage make falls likely. Call a professional inspector or emergency contractor if you suspect structural hazards, live near power lines, or see significant leaks.
Photo and video checklist
Take these shots clearly and deliberately so your insurer and contractor can assess damage. Keep shots steady and include a scale (coin/ruler) for close-ups.
- Close-up of hail dent on a shingle with a coin or ruler as scale.
- Wide shot of the entire roof from the ground showing affected areas (multiple angles).
- Close-ups of gutters and downspouts showing dings, separations, or blockages.
- Vents, flashing, metal components (ridge caps, vents, flashing) with visible dents.
- Nearby vehicle and siding damage — one clear shot of each damaged vehicle or siding panel.
- Measurement shots: a ruler or tape next to impacts to show size.
- Date/time-stamped video walkthrough of the exterior and any interior leaks.
- Aerial/drone shots if available — from a licensed pilot or hired pro; label as "Consider: check local drone/FAA rules and permits."
Infographic: Visual photo checklist showing exact shots to take after hail (close-up, scale, wide, vehicle damage, tarp)
Collecting corroborating evidence
- NOAA/NWS or local radar/storm reports (screenshots or saved PDFs).
- Local weather station hail-size reports (screenshot or exported data).
- Photos or statements from neighbors showing similar damage (date-stamped).
- Police or municipal reports if the storm prompted official notices.
- Sample recorded statement (one sentence): "On [date] at approximately [time], my property at [address] experienced hail; attached photos and local radar confirm hail and resulting damage."
Temporary protections
If you need to stop water intrusion, place a tarp secured with minimal roof penetration and photograph the tarp placement from multiple angles. Use licensed contractors when possible and keep receipts. Document all temporary fixes with the same photo rules above. This preserves safety and evidence — next, file your insurance claim.
How to file your hail roof damage claim
Contact options
First, call your insurer's claims line to open a claim — calling typically gets you immediate confirmation and initial instructions. You can also file through your insurer's online portal or mobile app, which is convenient for attaching photos and timestamps.
- Phone (claims line) — Pros: real-time, immediate guidance; cons: may require follow-up to submit photos or documents.
- Insurer portal / app — Pros: attach photos and documents, automatic timestamps and a digital record; cons: may be slower for getting live answers.
Suggested first-report script (copy and use):
"I need to report roof damage from the storm on [date]. I'd like to open a claim. Policy number is [#]."
What to include in your claim
Provide clear, specific items so the insurer can process your claim quickly:
- Storm date and location (when and where the hail occurred)
- Clear photos and video of all damaged areas (wide shots and close-ups)
- Measurements and size references (use a tape measure or place a common object like a ruler or coin in photos)
- Roof age and history (approximate installation year and any prior repairs)
- Policy number and property address (exact information as listed on your policy)
- Documentation of temporary repairs (receipts, photos of tarp or patches)
- Your contact information (best phone, email, and availability)
- Any corroborating storm reports (local weather reports or municipal storm statements, if available)
What not to say
Be brief and factual; avoid statements that could hurt your claim:
- Don't admit pre-existing damage (avoid saying the roof was already leaking or in poor shape)
- Don't promise a specific contractor or say you'll use one before the adjuster inspects (do not promise a contractor)
- Don't guess costs or causes (avoid estimating repair costs or declaring the cause unless an expert has confirmed it)
- Don't give inconsistent details — stick to the facts you documented
After you file, expect the insurer to schedule an adjuster inspection — keep your documentation ready and make any temporary repairs safe and documented for the adjuster.
Working with the insurance adjuster: inspections and estimates
Should your roofer attend
Consider having your roofer attend the adjuster inspection — yes, with conditions. A qualified roofer can point out hail-specific damage patterns and answer technical questions, which helps ensure the adjuster sees all issues. Coordinate the visit: get homeowner authorization in writing for the roofer to speak with the insurer, schedule a mutually agreed time, and confirm whether the adjuster allows a third party on the property. If the insurer resists the roofer’s presence, document the refusal (date, name, and reason) and ask the adjuster what the next steps are to ensure all damage is reviewed.
Quick talking points for your roofer:
- Briefly identify hail-related findings (impact patterns, bruises, fractured shingles).
- Point to specific areas of concern — e.g., "granule loss here" or "crack pattern along the ridge."
- Offer to provide photos and a short written summary for the adjuster’s file.
- Avoid arguing liability; stick to observable conditions and measurements.
Typical adjuster checklist
- Evidence of impact patterns or streaking across field shingles and concentrated zones.
- Bruising, indentation, or shingle fractures (visible breaks, splits, or deformed tabs).
- Granule loss and exposed mat — areas where granules are missing or felt is exposed.
- Dented or damaged metal components (flashing, vents, gutters, drip edge).
- Soft spots or signs of underlying decking damage when visible or suspected.
- Roof age, wear, and prior repairs noted for comparison to new damage.
- Photographic documentation and measurements of typical hail strike size/spacing.
- Interior observations (if any water stains or entry points are visible).
- Notes on roof slope, materials, and ventilation that affect repair options.
- Replacement vs. repair recommendation and any exclusions or limitations the adjuster records.
Communication dos and don'ts
- Dos:
- Ask for clarification: "Can you point out the primary hail-related findings?"
- Request an itemized estimate and photos that match line items.
- Take your own photos and notes while the adjuster is on site.
- Get the adjuster’s contact info and time/date of inspection for your records.
- Don'ts:
- Don't admit pre-existing damage or speculate about cause (stick to facts).
- Don't sign any forms or estimates you don't understand — request time to review.
- Don't argue with the adjuster on-site; note disagreements and follow up in writing.
- Don't assume silence means approval — ask how and when you’ll receive the estimate.
Homeowner scripts to use:
- "Can you point out the primary hail-related findings you’re recording?"
- "Will you itemize the estimate and include photos?"
- "May I have your name and the best contact number for follow-up?"
Phrases to avoid during the inspection:
- "It was fine before the storm" (can be interpreted variably).
- "This is minor, you’ll see" (let the adjuster document findings).
- "If you don’t approve this, my roofer will…" (keep communication non-confrontational).
When you receive the adjuster’s estimate, review the itemized findings and photos, compare them with your roofer’s notes, and request clarification in writing for any unclear or missing items before signing off.
Understand payouts: ACV vs RCV, two-check process, and depreciation
ACV (Actual Cash Value) is the amount your insurer pays up front that reflects the replacement cost minus depreciation for the damaged item or roof at the time of loss. ACV accounts for wear and age — it’s what the insurer considers the roof was worth right before the hailstorm.
RCV (Replacement Cost Value) is the full amount needed to replace or repair the roof with new materials, before depreciation is withheld. After you complete repairs and submit paid invoices, the insurer should release the withheld depreciation (the RCV final payment), bringing you up to the full replacement cost.
What ACV and RCV mean
ACV: Paid first; equals replacement cost less depreciation for age and condition. This is the initial check many homeowners receive.
RCV: The final amount paid after you finish repairs and present proof (paid invoices). This recovers the depreciation previously withheld and covers the remaining replacement cost.
Why two checks and the typical payment order
Insurers commonly use a two-step payment to ensure funds are used to actually replace or repair damaged property.
- ACV release: The insurer issues the ACV check right after claim approval. This reflects replacement cost minus depreciation.
- Homeowner/contractor completes repairs: You hire a contractor and get the work done.
- Submit invoices/receipts to insurer: Provide paid invoices or lien waivers showing the work was completed and paid for.
- Request recoverable depreciation (RCV): Once invoices are approved, the insurer pays the remaining depreciation (the RCV final payment).
Timeline chart: Two-check payment timeline from claim filing to ACV, invoicing, and final RCV payment with typical time ranges.
(Should fix: Typical time ranges vary by insurer and claim complexity — use ranges like "a few days to a few weeks" and verify with your carrier.)
Depreciation and recovery
Insurers calculate depreciation using age and insurer-specific lifespan tables for roofing materials (for example, an asphalt shingle roof may have a 20–30 year useful life on the insurer’s table). Depreciation is usually computed as a fraction of the replacement cost: (age ÷ useful life) × replacement cost = depreciation withheld. The ACV check equals replacement cost minus that depreciation.
To recover depreciation:
- Complete the repairs with a licensed contractor.
- Get and pay detailed invoices showing materials and labor.
- Submit those paid invoices (and any required forms) to your insurer and formally request the recoverable depreciation/RCV final payment.
- Follow up with the adjuster if payment is delayed; keep copies of all documents.
Example: a 10-year-old asphalt roof with an insurer lifespan table showing a 25-year useful life and a $15,000 replacement cost.
- Depreciation = (10 ÷ 25) × $15,000 = $6,000
- ACV paid initially = $15,000 − $6,000 = $9,000
- After you pay invoices for the completed work, the insurer should pay the withheld $6,000 as the RCV final payment.
(Example — typical lifespan and values; Should fix/verify with your insurer’s actual lifespan table and replacement-cost estimate.)
Cost and financial impact: deductibles, rates, and whether to file
Will my insurance rates go up
Filing a claim can sometimes affect future premiums, but outcomes vary by insurer, policy, claim size, and your claims history. In Texas, some carriers use claim frequency and claim severity when setting rates; others may not raise premiums for a single, small claim. Hedged language: filing a hail claim may increase your premium in some cases, especially if you have multiple recent claims or the claim is large. Ask your agent how the carrier treats weather-related or non-fault claims before you file.
How much is my deductible
Your deductible is the amount you must pay before insurance covers the rest. Find it on your policy’s Declarations (Dec) page — the first few pages that list coverages, limits, and the deductible amount or percentage.
- How deductibles are written:
- Dollar deductible — shown as a fixed amount (for example, $1,000).
- Percentage deductible — shown as a percentage of the dwelling limit (for example, 1% or 2% of the insured value).
- Quick check: look for lines labeled “Dwelling Deductible,” “Hurricane Deductible,” or simply “Deductible” on the declarations page.
- Need an example of the declarations page wording? See the Consumer Financial Protection Bureau for how policies list coverages and deductibles:
- Consumer Financial Protection Bureau — example references to declarations page (shows the term “Declarations Page” and where deductibles are listed)
Can I keep leftover money
If your insurer pays more than the cost to repair, whether you can keep the difference depends on your situation:
- If you own the home free and clear, most insurers will issue payment to the policyholder and you can use leftover funds, but the carrier expects funds be used to repair covered damage.
- If you have a mortgage, the lender usually has a financial interest (a mortgagee/loss payee). The insurer may issue checks payable to both you and the lender, or send funds to the lender to ensure repairs protect the mortgage collateral.
- Some lenders require proof of completed repairs before releasing full funds; they may place a lien or hold funds in escrow until work is finished.
Sample wording to discuss with your lender if proceeds exceed your mortgage balance:
- “Please confirm whether you require joint payee checks or funds held in escrow for repairs, and provide instructions for releasing any remaining balance after repairs are completed.”
Is it worth filing
Use the following decision factors to decide whether to file an insurance claim for hail damage:
- Estimated repair cost vs deductible — if estimated damage is less than or close to your deductible, filing may not make sense.
- Age and condition of the roof — older roofs or roofs near replacement may justify filing even for smaller damage because partial repairs could be temporary.
- Claim history — multiple recent claims can raise premiums; consider whether this claim would be your first in many years.
- Resale/insurability concerns — documented hail damage can affect future sale disclosures and buyer perceptions; a paid claim with professional repair may help.
- Timing — some damage may worsen over time; delaying could increase repair cost later.
- Out-of-pocket vs long-term cost — compare what you’d pay now versus possible higher premiums or future larger repairs.
Three-step sample calculation (simple, generic example):
- Estimate total damage cost: $X (roofing contractor estimate).
- Subtract your deductible: $X − $Y = net insurance payout.
- Compare net payout to repair cost:
- If net payout ≥ repair cost, filing likely covers the repairs.
- If net payout < repair cost, weigh out-of-pocket difference, potential premium impact, and roof condition before filing.
Example (illustrative only):
- Estimated damage: $5,000
- Deductible: $1,500 → Net payout = $5,000 − $1,500 = $3,500
- Repair cost = $5,000. Net payout covers part of repair; homeowner would pay $1,500 out-of-pocket. Decide whether partial coverage plus a claim on record is preferable to paying fully out-of-pocket now.
Notes on numbers and expectations
- The example above is a generic illustration only. Actual payouts, repairs, and premium effects vary by policy, carrier, and region. If you see any published “typical payout” figures, treat them as regional estimates and check the original source before relying on them.
Next: Immediate steps after a hailstorm: document damage safely
If your claim is denied: common reasons and next steps
Common denial reasons
- Pre-existing damage — Insurer says the damage existed before the hailstorm (example: old cracked shingles or prior patching).
- Lack of evidence — Claim denied because photos, date-stamped records, or contractor estimates are missing.
- Late reporting — Policy requires prompt notice and the insurer argues the claim was filed too late.
- Wear-and-tear / maintenance exclusions — Denial based on normal deterioration (example: granule loss from age, not storm).
- Policy exclusions / named perils — The policy excludes the specific cause (example: damage from improper installation or a non-covered event).
What to do next
- Read your policy and note deadlines — Check your declaration page and the “proof of loss” / “appeals” sections for exact deadlines. Many insurers ask for prompt notice and may have 30-day windows for certain responses, but timing varies — verify your policy.
- Collect and organize evidence — Gather date-stamped photos, video, weather reports for the storm date, repair estimates, invoices, and any prior roof inspection reports. Put files in one folder (digital and a backup).
- Request a copy of the insurer’s denial letter and claim file — Ask your adjuster in writing for the denial rationale and any internal notes or damage photos the company used. This helps target your next steps.
- Get an independent inspection — Hire a licensed roofer (like Blue Rhino Roofing) for a free or paid inspection and a written report that documents hail-specific indicators and damage timing. Attach contractor photos and a detailed estimate.
- Submit a supplemental claim or written appeal — Send a concise, dated appeal letter to your adjuster attaching the new evidence and the independent inspection. Keep copies and send via trackable mail or email. Reference any specific policy language that supports coverage.
- Consider a public adjuster or appraisal clause — If the insurer and you disagree on damage or value, you can hire a licensed public adjuster to negotiate for you, or invoke your policy’s appraisal (independent umpire) process if available. Public adjusters charge fees; appraisals follow the policy’s procedure and timelines.
- File a complaint with the Texas Department of Insurance (TDI) — If you believe the insurer acted unfairly, file a complaint with TDI for consumer assistance: Texas Department of Insurance — File a Complaint. TDI can review the insurer’s handling and may mediate.
- Keep strict timelines and records — Track all submission dates, phone calls (note date, time, person, summary), and receipts. Missing a deadline can forfeit appeal rights — when in doubt, act promptly and send materials with proof of delivery.
- Explore legal options only after other routes — If administrative steps don’t resolve matters, ask an attorney who handles insurance claims about next steps. Consult timelines in your policy and under Texas rules before pursuing litigation.
Proving hail damage: what insurers look for and proof checklist
Key evidence items — Numbered checklist
- Storm date and official storm reports — Find the exact storm date and official reports (use the NOAA database): NOAA Storm Events Database / NWS storm reports.
- Hailstone size reports from local stations — Weather station or NWS reports that list hail size near your property (recorded size is highly persuasive). Typical/estimate size references: pea ≈ 1/8", nickel ≈ 3/8", quarter ≈ 1", golf ball ≈ 1.75". Damage to asphalt shingles often becomes likely around ~1" and to metal/flat surfaces at similar or slightly smaller sizes — these are typical estimates and will vary by material and condition.
- Clear, dated photos and videos — Photos of roof areas with timestamped metadata or date overlays (see photo tips below). Capture both wide views and close-ups of impacted shingles, gutters, vents, and metal.
- Nearby vehicle or siding damage — Photographs of dented cars, damaged outdoor equipment, or siding on nearby homes — independent corroboration strengthens the claim.
- Measurements and scale — Place a ruler, tape measure, coin, or object of known size next to dents/holes to show scale; measure and note diameter of individual hail impacts when possible.
- Professional inspection report — A dated written roof inspection from a certified roofing inspector or contractor describing damage type, scope, and recommended repairs/replacement.
- Neighborhood corroboration — Statements, photos, or reports from neighbors, HOA, or local businesses showing the same storm impacts nearby.
How to photograph impacts for maximum evidentiary value
- Angles: Take one wide shot showing the whole roof line and surroundings, then multiple 45–90° close-ups of each damaged area.
- Scale: Include a ruler, coin, or measuring tape in close-ups to show size of dents/holes.
- Timestamps/metadata: Keep original image files with EXIF data or use a visible date/time overlay; note in writing when files are taken.
- Variety: Capture shingles, gutters, vents, skylights, flashing, and nearby vehicles — both before/after images if available.
- Context shots: Photograph the street address sign or house number in one shot for location confirmation.
When to get a professional inspection before filing
If you see visible roof damage, significant granule loss, dented metal, or if the storm produced hail reported at or above the typical damaging sizes above, get a professional inspection before filing. A contractor’s written report can: confirm cause (hail vs. wear), estimate repair vs. replacement, and document scope with photos and measurements — all of which speed insurer review. Expect a visual roof walk, photos, a damage description, and a written estimate; avoid contractor work until the insurer inspects unless it’s necessary to prevent further harm.
Next: Immediate steps after a hailstorm: document damage safely
Working with roofers, negotiation, and the 'by-the-book' honesty note
Questions to ask a roofer
- Are you licensed to work in this city/county?
- Do you carry liability and workers’ comp insurance? (Ask to see certificates.)
- How many years of experience do you have with insurance claims for roof hail damage?
- Can you walk me through a sample claims workflow — from inspection to payment and final inspection?
- Can you provide references from recent hail-damage jobs in my area?
- Will you provide a written, itemized estimate that lists materials, labor, and line-item pricing for any insurance submission?
Can contractors negotiate with adjusters
Contractors can advocate for accurate scope and pricing by explaining repairs and providing documentation, but they cannot bind your claim or accept/settle payment on your behalf unless you give them clear, written authorization. Always put any authorization in writing and keep copies for your records.
Handling estimate disputes
- Ask the contractor and the insurer for an itemized explanation of each differing line item — materials, quantities, and labor rates.
- Get a second opinion (another contractor or a detailed second estimate) to confirm scope and pricing.
- Invoke your policy’s appraisal or hire a public adjuster if differences persist — appraisal is a formal contract remedy; a public adjuster represents you for a fee.
When to escalate: if the insurer’s scope omits clear storm damage items, or estimates are materially lower than multiple independent quotes, escalate to a public adjuster or use the contract appraisal clause. Keep all communications and documents dated and saved.
By-the-book honesty note
Be transparent: document damage accurately, provide truthful invoices, and report work and timing honestly. Avoid misrepresentation such as billing for unrepaired items, inflating damage, misdating pre-existing damage as storm-related, or signing inspections you didn’t perform. Following these rules protects your claim, keeps your contractor’s license and insurance intact, and speeds a legitimate payout — and remember, policy coverage is determined by your insurer’s terms and the actual storm damage documented.
Policy coverage and exclusions for hail on different roof types
Cosmetic vs functional damage
Cosmetic damage refers to visible surface issues that don't affect the roof’s ability to shed water or protect the structure—things like minor granule loss, small dings in metal that don’t penetrate, or scuffs to coatings. Functional damage means harm that interferes with the roof’s performance or shortens its service life—split shingles, punctures, torn underlayment, or loose flashing.
Insurers often treat these differently: functional damage is more likely to trigger full repair or replacement payments, while cosmetic damage may be limited or excluded, depending on the policy language and the insurer’s claims guidelines. Always check your policy wording and insurer guidance rather than assuming either will be covered.
Shingle vs metal vs other materials
- Asphalt shingles: Often show granule loss, bruising, and cracking after hail. When hail causes shingle mat separation, cracking, or exposed fiberglass mat, insurers commonly consider that functional and may pay for repairs or replacement. Minor granule loss alone is frequently treated as cosmetic.
- Metal roofs: Tend to dent or crease from hail. Small dents that do not breach protective coatings or create leaks are more likely to be viewed as cosmetic; punctures or deformed seams that affect waterproofing are functional.
- Other materials (tile, slate, membrane): Tile and slate can crack or break (often functional if they create leak paths). Single-ply membranes can be punctured or split; whether damage is cosmetic vs functional depends on whether the material’s weatherproofing is compromised.
table — Compare coverage likelihood for asphalt shingle vs metal roofs vs other materials and cosmetic vs functional damage.
Table: Compare coverage likelihood for asphalt shingle vs metal roofs vs other materials and cosmetic vs functional damage.
| Roof material | Typical hail damage patterns | Cosmetic damage example | Functional damage example | Likelihood insurer pays (cosmetic vs functional) |
|---|---|---|---|---|
| Asphalt shingles | Granule loss, bruising, cracking | Surface granule loss with no exposed mat | Cracked shingles, torn self-seal, exposed mat | Cosmetic: lower likelihood; Functional: higher likelihood |
| Metal roofs | Dents, creases, scratched coatings, punctures | Small dents that do not affect seams or coating | Punctured panel, seam failure causing leaks | Cosmetic: often limited/excluded; Functional: more likely paid |
| Tile/slate | Cracks, broken tiles, displaced pieces | Minor chips or surface scuffs | Broken tiles creating leak paths | Cosmetic: limited; Functional: more likely paid |
| Membrane/flat roofs | Punctures, seam separation, blistering | Surface scuffs or minor granule loss on cap sheet | Punctures or seam separation causing leaks | Cosmetic: limited; Functional: more likely paid |
Note: The table shows typical tendencies, not guarantees. Policy language and insurer guidelines vary—always check your insurance contract and ask the adjuster for the basis of their decision.
Example scenarios where cosmetic damage might be excluded
- Granule loss on asphalt shingles that does not expose the fiberglass mat or cause cracking — insurer may deem this wear or cosmetic and limit payment.
- Small dents in metal panels that don't affect seams, fasteners, or coatings — may be categorized as cosmetic.
- Surface scuffs on tile or slate that don’t crack or displace pieces — often cosmetic.
In every example above, explicitly request that the adjuster point to specific policy terms or exclusions; documentation and contractor inspection reports help show whether damage is functional.
Older roofs and depreciation
Age can reduce what you recover. Many policies apply recoverable depreciation or use age-based schedules when calculating actual cash value (ACV) versus replacement cost value (RCV). Some insurers apply age cutoffs or steeper depreciation percentages for roofs beyond certain ages, but the thresholds and methods vary by carrier and policy form. Check your policy for how depreciation, replacement-cost eligibility, and any roof-age limits are handled, and consider getting an estimate and condition report from a qualified roofer to support your claim.
For next steps, see the section on deadlines and documentation to ensure you meet any regional or insurer filing timeframes.
Timing and legal rules: Texas and Houston/Katy-specific considerations
How long to report
- Report promptly — most homeowner and commercial policies require you to report damage promptly after discovery.
- Check your declarations page — your policy's declarations and conditions list any specific reporting deadlines or notice requirements.
- Statute of limitations / suit deadlines — if you need to file suit, the Texas statute of limitations for many property claims is two years (see Tex. Civ. Prac. & Rem. Code § 16.003). For exact application to your situation, check your policy and consult the Texas Department of Insurance or an attorney.
- Official resource: https://www.tdi.texas.gov/consumer/claims/index.html
(Do not treat this as legal advice — verify deadlines in your policy and with the Texas DOI or counsel.)
Insurer response time
Insurers commonly schedule an adjuster visit within 7–21 days after a busy storm period, though response can be faster or slower depending on claim volume. If you haven't heard within a week, follow up by phone and reference your claim number. Keep written records of calls, emails, and any promised timelines from the insurer or adjuster.
Permits, lenders, and escrow impacts
- Permits: Replacements or major repairs often require local building permits in Katy/Houston — your contractor can usually obtain these.
- Lender notification: If your roof is financed or the home has a mortgage, notify your lender as they may require approval before disbursing insurance proceeds.
- Escrow and insurance requirements: Insurance payouts sometimes go into escrow if a mortgage is active; lenders may require lien waivers or inspections before releasing funds.
Next steps after repairs: keep permit receipts, final invoices, and lien releases; provide copies to your insurer and lender as needed to close the claim and release any escrowed funds.
Additional instructions
- Texas Department of Insurance (official consumer claims guidance): https://www.tdi.texas.gov/consumer/claims/index.html
After repairs: submitting invoices, supplements and follow-ups
Submitting final invoices for RCV
Follow these numbered steps to submit your documents when you’re ready to recover the remaining depreciation (RCV) after repairs are finished. Send these items to your insurance adjuster and your insurer’s claims email/portal (keep copies for your records).
- Final contractor invoice — Itemized invoice showing labor, materials, and total cost for the completed repairs or replacement.
- Proof of payment — Paid receipt, bank/credit card statement, cancelled check, or contractor payment receipt showing you paid the invoice in full. If you paid in installments, include receipts that show the final payment.
- Permit final / inspection sign-off — Copy of the municipality’s final inspection or permit closeout document (if permits were required).
- Photos of completed work — Clear “after” photos (wide shots and detail shots) showing repaired or replaced areas and finishes. Include a couple of photos that match earlier “before” images if available.
- Lien waivers — Contractor-issued lien waivers (final) showing there are no outstanding subcontractor or supplier liens.
- Cover letter / request for RCV release — Short letter or email stating you’re requesting the release of recoverable depreciation (RCV), referencing the claim number and attaching the above documents.
- Tip: Label files with the claim number and document type (e.g., CLAIM12345_FinalInvoice.pdf) to speed review.
- Hedge on timing: Many insurers expect RCV requests promptly after final payment; some policies or carriers set specific windows (commonly within months of initial payment). If you’re unsure of your policy timeline, check your insurance policy or contact your adjuster to confirm.
Filing a supplemental claim
Use this instruction list when you find additional damage or the contractor discovers more work is needed after your initial claim.
- When to file: File a supplemental claim as soon as new damage or additional needed repairs are discovered — do not wait until the end of the project. Prompt reporting prevents disputes over whether damage is related to the original event.
- What to include: New photos, a supplemental itemized invoice from your contractor (clearly marked “supplemental”), any additional permit or inspection documents, and a brief explanation tying the new damage to the original loss event (hailstorm, wind, etc.).
- How to submit: Send the supplemental packet to your original adjuster and the insurer’s claims department, reference the original claim number, and request that the claim be reopened or supplemented. Keep delivery proof (email sent receipts or portal upload confirmations).
- Working with the adjuster: Expect an adjuster re-inspection or a desk review. Be ready to schedule a reinspection and provide access for the adjuster or an independent appraiser if needed.
- If denied: Ask for a written denial and the reason. You can provide additional documentation (photographs, contractor statements) or request a re-inspection or appraisal per your policy’s appraisal clause.
If repairs are delayed or additional damage occurs
If repairs take longer than expected or additional damage (like consequential or secondary damage) appears, document it immediately: take dated photos, preserve damaged materials if safe, and notify your insurance company in writing. Consequential damage (for example, water intrusion from a delayed roof repair) may be covered if you can show it resulted from the original insured event and you reported it promptly. For roofing-specific situations, keep your contractor looped in — they can help document cause, scope, and necessary emergency measures (temporary tarps, dry-in) while you pursue supplements or re-open the claim.
How hail roof claims connect to residential roofing planning and maintenance
How claims affect roof decision-making
Hail claim outcomes often drive the core decision of repair vs. replacement: if an adjuster documents widespread shingle fracture, granule loss, or structural compromise, replacement is typically recommended; isolated dents or surface damage may justify targeted repairs. Claim payments and documented damage also influence material selection — homeowners and contractors may choose higher-durability shingles or impact-rated products when the claim establishes a likelihood of future storm exposure. When insurance funds are used for a replacement, confirm how that interacts with the roof manufacturer's warranty and any contractor guarantees, since some warranties require specific materials or installation methods to remain valid.
Maintenance and inspection programs
- Scheduled inspections: annual or biannual roof inspections to spot early hail-related deterioration.
- Post-storm assessments: prompt inspections after major hail events to document damage while conditions are clear.
- Pre-storm documentation: keep dated photos of the roof’s condition and any recent repairs to simplify claims.
- Maintenance records: maintain receipts and service logs for repairs, sealants, or partial replacements to support future claims.
- Professional documentation strategies: contractors can prepare written condition reports and measured damage estimates to submit with claims.
Financing and timing implications
Insurance payouts, including recoverable depreciation, affect the timing and size of available funds for a repair or replacement and may determine whether short-term financing is needed to begin work before full recovery. Recoverable depreciation typically requires completion of the approved repairs and submission of final invoices before insurers release the withheld amount—plan timelines accordingly and confirm whether using insurance proceeds will alter warranty or lien paperwork. For practical guidance on claims, documentation, and how payouts work, see the Insurance claims resource hub (/insurance-claims/).
Practical final checklist and answers to frequently asked procedural questions
One-page checklist — Numbered, printable short checklist
- Call your insurer to report the claim and get the claim number.
- Take time-stamped photos and video of all roof and exterior damage.
- Protect the property: tarp visible openings and move valuables out of affected areas.
- Keep receipts for emergency repairs, tarps, and temporary housing.
- Schedule a free roof inspection with a reputable contractor (avoid storm-chaser scams).
- Provide the insurer with photos, receipts, and the contractor’s inspection report.
- Attend the insurance adjuster inspection — walk the roof with them if possible.
- Get a written estimate (RCV and ACV) from your contractor after adjuster review.
- Review the settlement offer carefully; ask the contractor for help if numbers don’t match.
- Approve repairs only after the contract and payment terms are clear; keep all paperwork.
Quick facts — Bulleted quick answers
- Car vs home claims: Auto hail claims are billed under auto insurance (comprehensive) and often settle faster; home/roof claims go through homeowners insurance and may include separate line items for roof, gutter, siding, and interior damage.
- Damage threshold (general guidance): hail ≥ 1" (quarter-size) can dent metal and bruise shingles; 1.5"–2" (ping-pong to golf-ball) commonly causes visible shingle loss, granule loss, and leaks. Use this as a general rule, not a guarantee — actual damage depends on hail velocity, roof age, and materials.
- Average payout ranges (regional estimate): Typical roof hail-claim settlements nationally often cluster around $8,000–$15,000 (many sources report averages near $12,000) — regional estimate; amounts vary widely by roof size, damage severity, deductible, and policy. Source: ConsumerShield / industry summaries.
- Source: https://www.consumershield.com/articles/average-insurance-payout-for-hail-damage-roof (regional estimate)
- Sample timeline (storm to final RCV) — typical sequence:
- Days 0–7: Report claim; document damage; emergency tarps if needed.
- Days 3–14: Insurance assigns adjuster; contractor inspects and provides estimate.
- Weeks 2–6: Adjuster and contractor finalize scope; insurer issues initial payment (ACV or depreciation holdback).
- Weeks 6–12+: Repairs complete; contractor submits final invoice; insurer pays remaining RCV minus deductible (if applicable).
Timeline varies by storm volume, insurer backlog, and complexity of damage.
- When numbers appear off: If the adjuster’s scope misses evident damage (gutters, vents, siding), ask for a re-inspection and provide your contractor’s measurement-backed estimate.
Ready for the next step? Move on to Immediate steps after a hailstorm: document damage safely to learn exactly what to photograph and how to preserve evidence for your claim.
Frequently Asked Questions
Will my insurance rates go up after a hail roof claim?
Possibly — filing a hail claim can lead to higher premiums depending on your insurer, claim history, and state regulations; small or first-time claims sometimes don’t affect your rate. Check your policy and talk to your agent to understand how a claim might impact your specific premiums.
How long do I have to report hail damage on my roof in Texas?
Report hail damage as soon as possible — insurers require prompt notice and time limits vary by policy. Read your policy for the exact deadline and notify your insurer right away to avoid coverage issues.
If my policy is ACV, how is depreciation calculated and can I recover it later?
ACV pays the roof’s current value after depreciation is applied for age and wear, and you can recover depreciation only if your policy includes a recoverable depreciation or replacement-cost endorsement and you submit receipts for completed repairs. Confirm with your insurer whether recoverable depreciation applies to your claim.
Should I have my roofer meet the insurance adjuster at my home?
Yes — it’s recommended because a qualified roofer can point out hidden or systemic damage and explain repair needs to the adjuster. Make sure the roofer lets the adjuster perform their independent inspection while providing supporting documentation or photos.
Call to Action
Schedule a free, no‑obligation roof inspection with a local Houston/Katy roofing expert to document hail damage, get a written estimate, and protect your insurance claim window — call or schedule online today.
Inspections are free, no‑obligation, and your information is kept private.
Frequently Asked Questions About Hail Roof Claims
Will my insurance rates go up after a hail roof claim?
Many hail claims do not automatically trigger a premium increase for every homeowner. Insurers review your claims history, the size and frequency of claims in your area, and your policy underwriting. In Texas, insurers may raise rates for groups of policyholders after severe storm seasons or adjust premiums at renewal if your property is in a higher risk band. If your carrier considers your address higher risk or you file multiple claims in a short period, your renewal premium is more likely to change. You can reduce surprise increases by asking your agent how a single claim affects renewals, checking whether your policy has a surcharge schedule, and comparing quotes before renewal. If you want to keep control over timing and documentation, consider documenting damage and getting a contractor estimate before filing so you file only when the likely payout justifies any possible rate effect, which also makes scheduling an inspection straightforward.
How long do I have to report hail damage on my roof in Texas?
Most policies require you to report damage promptly, which generally means as soon as reasonably possible after you discover it. There is no single statewide deadline written into every homeowner policy; specific notice periods appear in your policy language and in any amendments. Texas law does not create a uniform short reporting window that overrides contract terms, but statutes of limitations for lawsuits typically start to run from the date of the loss or discovery. To preserve coverage and preserve evidence, report suspected hail damage within days to a few weeks of the storm, and keep copies of dates, photos, and any third-party storm reports. If you are unsure, notify your agent quickly and ask for guidance so you do not unintentionally miss a policy notice requirement.
If my policy is ACV, how is depreciation calculated and can I recover it later?
Actual cash value means the insurer pays the depreciated value of the damaged item up front. Depreciation for roofing is typically based on the roof's age relative to an expected useful life using insurer tables or state-approved schedules for materials. For example, if a 20-year shingle is 10 years old and the insurer uses a straight-line schedule, the depreciation might be about 50 percent. If your policy includes recoverable depreciation (RCV), the carrier will release the recoverable portion after you submit proof of completed repairs or replacement such as paid invoices, permit closeouts, and photos of finished work. If your policy is strictly ACV with no RCV provision, the depreciated amount is not recoverable. To maximize recovery, save contractor invoices, receipts, and final permit paperwork and submit them promptly according to the insurer’s instructions.
Should I have my roofer meet the insurance adjuster at my home?
Yes, having a qualified roofer attend the adjuster inspection is often helpful. A roofer can point out hail-specific damage patterns, document soft spots and hidden issues, and provide a contractor estimate the adjuster can compare to their scope. Coordinate with your roofer and notify your insurer ahead of the inspection so there is no confusion about who will be present. If the insurer resists a contractor’s presence, attend the inspection yourself and insist on a thorough walkthrough; take your own photos and ask the adjuster to note any items you believe were missed. Keep interactions factual and avoid arguing on-site; a roofer can follow up with a supplement or an independent estimate if the adjuster’s scope omits legitimate damage. When you want a clean claim record and a stronger basis for recoverable depreciation, an inspection with a local roofer often pays off.
Schedule a Free Roof Inspection
Protect your claim window and get professional documentation by scheduling a free, no-obligation roof inspection with a local Houston/Katy roofing expert who will document hail damage and provide a repair or replacement estimate. Schedule your inspection.

Shawn Swearingen
Shawn Swearingen leads Blue Rhino Roofing, a BBB A+ accredited, Texas-licensed roofing company based in Katy. He's on the roof and on the phone, and known for telling homeowners the straight truth about whether they need a repair or a replacement.